The Blender top bar in blender houses a variety of tools inside of blender ranging from the Main Menu, to WorkSpaces to Scenes & Layers. Each of these of these tools play a crucial role with streamlining any workflow inside of Blender, along with regular easy to access menus for every day work.
The topbar contains a series of menus aimed at various different tasks. They are so common inside of Blender that it is one of the few menus which are always going to be available no matter where you are in blender. Let’s go through the list to understand what each section can do.
Blender Menu #
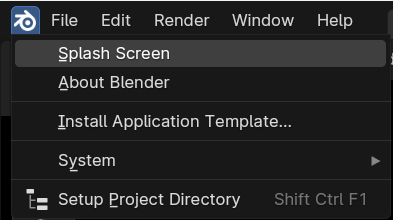
The Blender Menu is a special button which looks like the Blender Logo. This button contains a series of buttons useful for seeing the blender version, date, splashscreens and more.
File Menu #
The File menu in the top bar is the go-to menu for all things relating to the actual project you are working on. It includes opening the project files, saving, importing/exporting assets from other project files and a few other things.
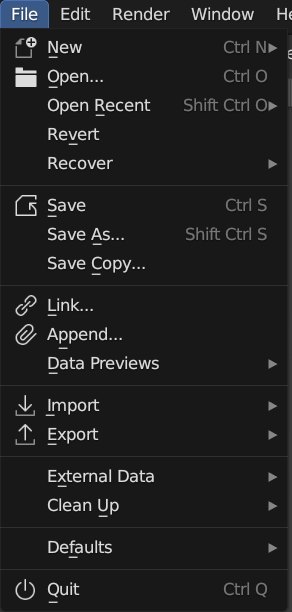
Let’s go through the menu and see what each one does:
- New – button lets you create a brand new project and closes the current project. There is also a side drop-down with more options which lets you choose from a specific new template.
- Open… – This lets you open a previously saved blend files
- Open_Recent – This displays some of the most recent blend files which you have saved yourself from this version of Blender.
- Revert – This lets you reopen the currently open file back to its previously saved state. So if you’ve done a lot of changes but decide to go back to the beginnning, you don’t need to entirely reopen it using the Open… button but instead just click revert
- Recover – This lets you open auto-saved files from the temporary file – This is useful if for example Blender crashes without you having saved
- Save – This button lets you save the current file
- Save As… – This lets you save the current file with a new name from the file browser
- Save Copy… – Here we can save a copy of the current file but it keeps the current save open
- Link… – Here we can link data from another blender file. You can only edit this data from the original blender file itself. Blender will simply display this data inside this new file, but uneditable.
- Append… – Append lets you import data from another blender file. This option makes a fresh copy of the imported data and is editable inside this new file.
- Data Previews – This is a tool for managing data-block previews. This is for example displaying a small preview of the current project file from within the File Browser. It can also store previews for scenes, collections and objects but you’ll need to manually click generate for these to appear correctly. This has a variety of tool settings.
- Import – Next we have import. This lets you import files from another format. Some file formats are not available here, but often there is an addon for Blender which lets you import these.
- Export -As above with importing, you can also export the files to other formats which can be read by other programs
- External Data – External data is referred to files such as image textures that can be stored inside of this current .blend file. This can be useful if you’re sending a project to someone else and they also need the same texture files. From here you also have the option to relocate missing external files, pack all the files into the current file, unpack the currently packed files into a folder next to the .blend file as well as making the file paths relative and absolute.
- Clean up – This lets you remove certain data blocks from the current blend file. This can be for example materials which are not used by any objects, or textures which are not used in any materials.
- Defaults – Here we can save new defaults for example the blender start up file, which lets you change the blender window to how you like, and then save that as the start up file and it will then load this file every time blender starts. I personally like to remove all uncessary objects from the scene so i have more empty space to work with. You can also from this menu reset the factory settings which also turn off all addons back to Blender’s original base state.
- Quit – Finally we have quit which closes blender and also a quit.blend file is created in the temporary file path, the same location as the auto-saves
Edit Menu #
The edit menu in the top bar is mainly used for functions such as customization of the user preferences, undoing and redoing past actions as well as searching for specific tools used inside of Blender.
Let’s go through the Edit menu and see what each option does
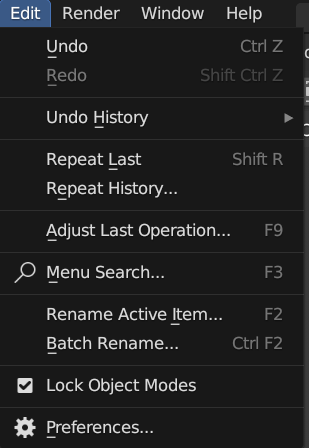
- Undo – This will undo the previously made actions.
- Redo – Here we can redo any actions which have been previously undone. For example if you undo the last action but decide you actually want to go forwards again you can redo.
- Undo history – This displays a large list of all the last undo-actions which can make it easy to browse to a specific point in time and undo all actions to that point. You can increase the number of undo actions from the preferences panel under Edit>Preferences>System>Memory & Limits > Undo Steps
- Repeat Last – This lets you repeat your last action with Shift + R. For example if you moved a cube along the x axis by 10cm. If you press repeat last, you’ll be able to redo that action and move the cube on the x axis by a further 10cm
- Repeat History… – This button will let you display a list of all the last repeated actions. If you repeat an action, it will get put into this list for later use.
- Adjust Last Operation… – If you previously made an action, you can press F9 or this button to adjust the operation parameters and other tool settings. If for example you move a cube along the X axis by 10cm and then press Enter, you can then press F9 and you’ll be able to adjust the distance and axis you moved the cube on. Almost like undo, but instead you’re fixing it with one action.
- Menu Search – F3 – The menu search button lets you quickly search for a function inside of Blender. This can be helpful if you do not remember where a specific button is, you can just press F3 and then type the name of the function you want.
- Rename Active Item… – Here we can rename the currently selected item.
- Bath Rename… – With this button we can rename multiple data types at the same time
- Lock Object Modes – This prevents you from selecting objects which are in different modes to the currently selected object. For example if you are in Vertex Paint mode for one object and Lock Object Modes is unchecked, then you can select another object and be taken into whichever mode that object is, for example object mode
- Preferences – This is the Preferences Window which is where you can control how blender acts. This can be uniquely set up for every user to whatever their preference may be.
Render Menu #
Next we are onto the Render Menu for Blender. This is where the magic happens and where you can view the final output of your images.
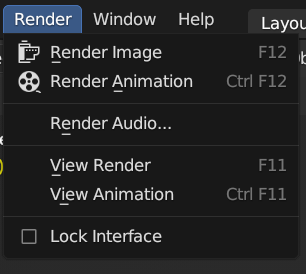
- Render image – F12 – This renders the current scene to the current frame of the camera. A Camera is required.
- Render Animation – CTRL+F12– This will render the current animation based on the timeline start and end frames
- Render Audio… – This will export the current audio from the scene into a sound file
- View Render – F11 – This will allow you to display the render window.
- View Animation – CTRL + F11 – View animation will allow you to playback the last rendered animation in a separate player built into Blender. This will also play the animation from individual image frames. You can change to another external video player from the preferences panel.
- Lock Interface – This will lock the user interface to prevent the user from adjusting values or moving around the scene while it is rendering. This will help save on memory when rendering. This is off by default
Window Menu #
The Window Menu in Blender is designed to manage and customise the software’s interface and layout. Here the users can adjust how different panels and editors will be displayed such as creating additional windows which can be very useful for multiple monitor setups.
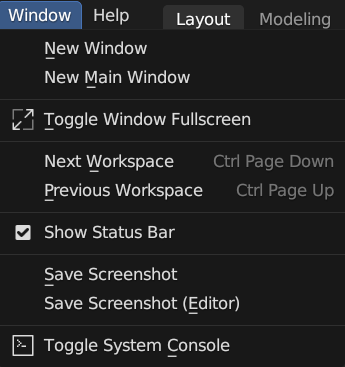
- New Window – This will create a new window based on the current main window. This can be dragged onto another monitor for a multi monitor setup
- New Main Window – This will create a full blender interface exactly like the current one with its own workspace and scene selection, menus and more.
- Toggle Window Full-screen – With this option you can make the window full screen so it takes up the entire screen
- Next Workspace – Here we can quickly switch to the next workspace available on the topbar
- Previous workspace – This one lets us switch back to the previous workspace
- Show Status bar – The status bar is an information bar along the bottom of blender which displays vital information about the current blender file.
- Save Screenshot – This will save a screenshot of the current Blender Window and it will then ask you where you want to save this image through the file browser.
- Save Screenshot(Editor) – Unlike the previous button which will save the whole Blender Window, the Editor option, once pressed, will enable a special cursor and when you click on a specific editor of Blender it will capture a screenshot of this editor and Blender will then open the file browser and ask where you’d like to save it.
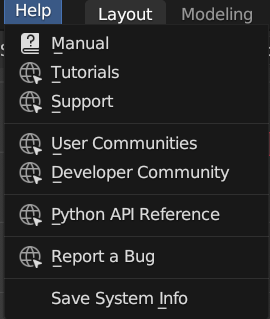
Help Menu #
If you ever get stuck with Blender, you can click on this help menu to bring up a bunch of useful resources to find the information you require to complete your task.
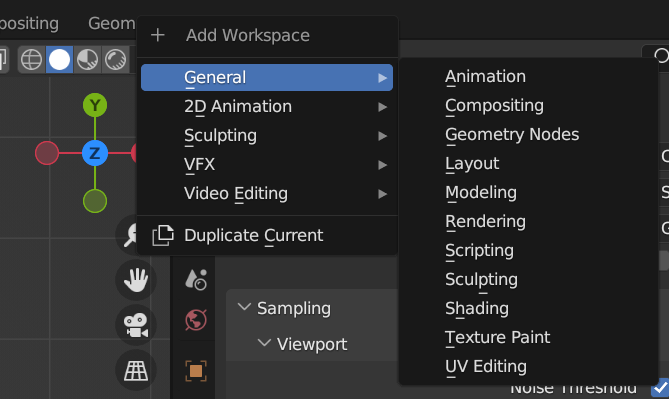
Workspaces #
In Blender you have the ability to totally modify the interface to your workflow and liking. Over at this workspaces panel, you have the option to choose predefined layouts created for specific workflows. For example you may want to do some sculpting, and instead of creating a dedicated sculpting interface layout you can just select the predefined “Sculpting” workspace
Not only that, you can add more predefined workspaces by clicking the + icon at the end, and choosing from the large list of workspaces, or you can click Duplicate current which will make a copy of your current layout and save it for future use.